Asioiden rikkominen ei ole koskaan hauskaa, ja se tarkoittaa usein jonkin heittämistä ennalleen. Sinulla voi olla runsaasti rikkoutuneita teekuppeja, kuvakehyksiä, huonekaluja tai muita yleisiä taloustavaroita, joiden uskot kuuluvan roskakoriin.
Päinvastoin, on olemassa monia erilaisia projekteja, joita voit tehdä näiden rikkoutuneiden esineiden kanssa ja luoda upea sisustus sisätiloihin ja ulos, kaikki asioista, joita saatat pitää roskakorina. Olemme keränneet luettelon sadasta eri projektista, jotka vaativat näitä rikki esineitä tai tavallista kotitalousjätettä.
Repurposing on loistava tapa pitää asiat poissa kaatopaikoista ja antaa kodillesi pieni sisustusparannus. Nämä projektit ovat suhteellisen helppoja, vievät vähän aikaa ja mikä parasta, niiden avulla voit käyttää roskat kokonaan hyödylliseksi.
Tartu rikki taloustavarasi ja katsele erilaisia tapoja, joilla pystyt palauttamaan sen elämään. Tiedät mitä he sanovat - Yhden tytön roskat ovat toisen tytön aarteita.
Tee rikkoutuneesta kuvakehyksestä korvakorun pidike
Kun hajotat (tai lapsesi tai lemmikkisi rikkovat) lasin kuvakehyksestä, älä heitä jalustaa pois. Käytä sen sijaan sitä upean ja erittäin toimivan korvakorunäytön luomiseen. Tarvitset jonkinlaisen langan (kuvajohto toimii todella hyvin), jotta voit ripustaa korvakorusi. Aja vain johto rungon poikki ja ripusta sitten korvakorusi. Tämä on hieno lahjaidea kaiken ikäisille tytöille, ja voit juosta niin monta langaa, tehdä niin monta tasoa kuin haluat. Jos sinulla on pidempiä ripustavia korvakoruja, tee pidemmät tasot.
DIY-ohjeet ja projektiluotto - Kevinandamanda

Luo Play-keittiö Broken Entertainment Centeristä
Sen sijaan, että veisit vanhan viihdekeskuksen kaatopaikalle, ota muutama tunti ja muuta se suloiseksi leikkikeittiöksi pikkutytöllesi. Keskuksen ei tarvitse olla täydellisessä kunnossa, koska voit vahvistaa mitä tahansa sitä tarvitsevaa, eikä sen todellakaan odoteta olevan paljon painoa. Vain pieni maali ja mielikuvitus ovat kaikki mitä tarvitset kääntääksesi vanhan silmänpohjan sellaiseksi, josta jokainen pieni tyttö saa tuntikausia iloa. Lisäksi se on loistava paikka tallentaa kaikki leikkikeittiöt.
DIY-ohjeet ja projektiluotto - Diynetwork

Luo kierrätyskeskus, jossa on vanha kori
Jos sinulla on melko suuri kori, joka näyttää hajoavan saumoista, voit käyttää sen uudelleen suureksi kierrätyskeskukseksi. Korin ei tarvitse pystyä pitämään mitään, joten reiät pohjassa ovat täysin kunnossa. Aseta vain jätekorit pajukorin sisälle kierrätystä varten ja merkitse sitten osiot, jotta tiedät missä kaikki menee. Paitsi, että tämä auttaa sinua käyttämään sitä revitty kori hyvään käyttöön, se tarjoaa sinulle todella houkuttelevan paikan kierrätysmateriaalien säilyttämiseen.
DIY-ohjeet ja projektiluotto - Bhg

Luo uusia kesän varvastossuja vanhoilta
Sen sijaan, että heittäisit varvastossut, kun hihnat irtoavat, etkä voi pitää niitä yhdessä, harkitse kaikkien uusien kenkien luomista niistä. Vain vähän kangasta, voit tehdä näistä suloisista punotuista varvastossuista, jotka sopivat täydellisesti kesälle ja joiden avulla voit pitää vanhat kengät silloinkin, kun ne näyttävät olevan valmiita roskakoriin. Voit jopa tehdä punotut hihnat vanhoista t-paidoista tai muista vaatteista, joissa on reikiä ja jotka on heitettävä ulos, joten tämä on kaksinkertainen pisteet.
DIY-ohjeet ja projektiluotto - Makeit-loveit

Käännä vauvan kosteuspullot matkapuhelimen latausasemiksi
Vauvan kosteusemulsiopullot pyrkivät purkamaan roskakoriin, kun ne ovat tyhjiä. Loppujen lopuksi, mitä voisit tehdä niille tyhjille pulloille? Voit luoda todella kätevän matkapuhelimen latausaseman, joka estää johtoasi olemasta ulkona. Vain vähän kangasta, hiukan leikkausta ja vähän aikaa, voit tehdä tästä todella kätevästä matkapuhelimen latausasemasta, joka pitää puhelimesi ja johdon suoraan ylöspäin laajennuksen vieressä, mikä säästää tilaa ja johto ei makaa lattia (joka on muuten huono paikka sille, jos sinulla on lemmikkejä).
DIY-ohjeet ja projektiluotto - Makeit-loveit

Tee valaisimia vanhoista lankakorista
Sen sijaan, että lähetät nuo vanhat lankakorit kaatopaikalle, vaikka ne olisivatkin täysin kuluneet, tee niistä todella houkuttelevat valaisimet. Vaikka koreissa olisi irrotettuja johtoja tai niiden pohjassa on reikiä, voit käyttää niitä luomaan Antropologian innoittamia valaisimia, jotka näyttävät hyvältä keittiössä. Sinun tarvitsee vain valmistaa kori ja kytkeä sitten riipusvaloosi. Voit maalata sen vastaamaan keittiön sisustusta etukäteen, jos haluat tai vain jättää sen sellaisenaan.
DIY-ohjeet ja projektiluotto - Ashleyannphotography

Käytä rikkoutuneita kattiloita puutarhamerkintöinä
Jos sinulla on terrakotta-kattiloita, joiden kulutus on hieman huonompi, sinun ei tarvitse heittää niitä ulos. Voit käyttää niitä tekemään upeita puutarhamerkkejä. Tämä toimii jopa, jos sinulla on vain yksi potti, joka on rikki. Ota vain muutama pala ja kirjoita kukkien, yrttien tai vihannesten nimet taikamerkillä, jotta se ei irtoa tai voisit olla todella luova ja maalata nimet päälle (voit luoda niihin myös vähän taidetta) ). Jos sinulla on useita vanhoja ruukkuja, jotka eivät sovi istutettaviksi, merkitse ne puutarhasi kaikkeen.
DIY-ohjeet ja projektiluotto - Hardlywives

Muuta vanha pukeutuja kodikkaaksi penkiksi
Rakastan kaikkea tässä huonekalujen uudistushankkeessa! Ohjeet ovat yksinkertaisia, ja jos onnistut saamaan yhden näistä vanhoista pukeutujista halvalla, tämä on pakko tehdä!
DIY-ohjeet ja projektiluotto - Grillo-mallit

Käännä rikki terrakotta kurpitsaan
Vanhoja rikkoutuneita terrakotta-istutuskoneita voidaan käyttää luomaan kauniita kurpitsaa. Voit itse tehdä tämän millä tahansa keramiikalla, joten jos sinulla on rikki lautasia tai lautasia, käytä niitä myös. Sinun tarvitsee vain tehdä pieniä paloja ja sitten koota mosaiikkimainen ilme vaahtokuulalle. Tämä on myös hieno projekti jouluun, vain voit käyttää loma-värejä koristeiden luomiseen. Niitä on todella helppo tehdä, ja se voittaa vain rikkoutuneiden istutuskoneiden ja lautojen heittämisen roskakoriin.
DIY-ohjeet ja projektiluotto - Craftsncoffee

Luo taidetta murtuneilla levyillä
Sen sijaan, että heittäisit heti säröillä olevat levyt, miksi et tekisi niistä taidetta, jonka voit näyttää keittiön tai ruokasalin seinällä? Tämä on hieno projekti levyille, jotka todella hajotetaan kahteen tai useampaan kappaleeseen. Et todennäköisesti halua liittää niitä takaisin, jos ne ovat pirstoutuneet, mutta jos sinulla on vain muutama suurempi pala, voit vain liimata ne yhteen tällä tavalla ja käyttää niitä koristamaan seiniäsi. Se on todella hieno projekti vanhemmille ruokalajeille, joista et voi vain päästä eroon, vaikka ne olisivat rikki.
DIY-ohjeet ja projektiluotto - Homelife

Tee lintukylpy halkeilluilla istutuskoneilla ja lautasilla
Käytä näitä säröillä olevia terrakotta-istutuskoneita ja niitä rikkoutuneita tai säröillä olevia levyjä luodaksesi kauniin lintuhaudon puutarhaan. Voit käyttää erikokoisia istutuskoneita, joten jos sinulla on useita vaurioituneita, tämä on hieno tapa käyttää niitä uudelleen. Sinun tarvitsee vain maalata ne (jos haluat), jotta niistä tulee vähän ainutlaatuisia ja sitten koota. Rakastat laittaa nämä säröillä olevat levyt ja istutuskoneet parempaan käyttöön ja linnut rakastavat sinua myös siitä.
Tee-se-itse-ohjeet ja projektiluotto - Patriciaspotit

Tee uudelleenkäytettävä laukku rikkinäisistä sateenvarjoista
Kun sateenvarjon metalli rikkoutuu, on normaalisti aika roskakoriin. Nyt voit kuitenkin käyttää kyseisen sateenvarjon kangasta luomaan nämä todella siistit taitettavat uudelleenkäytettävät pussit. Siellä on vähän ompelua, mutta kaiken kaikkiaan näiden pienten pussien luominen on todella helppoa ja ne taittuvat rullaksi, jotta voit laittaa ne mukaasi mihin tahansa. Nämä sopivat erinomaisesti improvisoituihin ostosmatkoihin, kun tarvitset uudelleenkäytettävää laukkua tavaroiden kuljettamiseen kotiin. Ne ovat niin pieniä, että voit pitää yhden kukkarossasi etkä koskaan tiedä, että se on siellä.
DIY-ohjeet ja projektiluotto - trenditön elämä

Tee helmiä rikkinäisistä pulloista
Luultavasti heität rikkoutuneen pullon normaalisti. Sinun ei kuitenkaan tarvitse. Voit käyttää tätä menetelmää sen sijaan luoda kauniita lasihelmiä pullosta. Sitten voit käyttää helmiä tekemään mitä tahansa muuta käsitöitä koruista tuulen soittokelloihin tai mitä tahansa. Huomaa, että tämä voi olla vaarallinen vene, joten sinun on aina noudatettava varovaisuutta ja suojattava silmiäsi lasinsirpaleilta. Jos kuitenkin saat sen kiinni, ei ole mitään rajoitusta sille, mitä voisit luoda noista vanhoista pulloista.
DIY-ohjeet ja projektiluotto - Instructables

Tee kaksi pöytää rikkoutuneesta pöydästä
Jos sinulla on naarmuuntunut, rikkoutunut tai muuten vahingoittunut keittiön pöytä tai sitä, jota et todellakaan tarvitse enää, älä heitä sitä ulos. Sen sijaan voit luoda sen avulla kaksi ihastuttavaa seinäpöytää, jotka ovat varmasti osuma kotona. Et todellakaan tarvitse pöydän keskikohtaa, joten tämä on hieno projekti pöydille, jotka ovat todella vahingoittuneet keskellä. Leikkaa vain päätyosat, maalaa tai tahraa ne ja kiinnitä ne sitten seinään.
DIY-ohjeet ja projektiluotto - Migonishome

Tee teevalot pullotulpista
Ok, joten pullonkorkit eivät todellakaan ole rikki, kun heität ne ulos, mutta ne voidaan varmasti käyttää joka tapauksessa. Voit käyttää niitä luomaan suloisia kynttilänjalkakynttilöitä, jotka ovat täydellisiä silloin, kun tarvitset paljon kynttilöitä (ajatella häitä tai muita suurempia tapahtumia). Sinun tarvitsee vain puhdistaa pullon korkit, lisätä sydänlanka ja kaada sitten vaha. Vaha tulee itse asiassa sulaneista värikynistä, joten tämä on kaksinkertainen pisteet. Pidät nuo pullonkorkit poissa kaatopaikasta ja sinulla on jotain, mitä voit tehdä vanhojen rikkoutuneiden värikyntien kanssa.
DIY-ohjeet ja projektiluotto - Austinweddingblog

Tee uusia värikyniä murtuneista
Sen sijaan, että heität nuo rikkoutuneet värikynät, tee niistä uusia sateenkaarikriittejä. Tämä on niin yksinkertainen projekti, ja lapset rakastavat ehdottomasti näitä sateenkaarikriittejä. Tarvitset muutaman tölkkipurkin, tyhjät reseptipullot tai ne pienet muovikanisterit, joihin kalvo tulee, ja muutaman rikkoutuneen väriliidun. Sulatat väriliidut periaatteessa tölkkeihin (puhdista ne ensin perusteellisesti) ja kaada sitten pulloihin, kunnes ne kovettuivat. Väriliidut ovat täydellisen kokoisia ja voit tehdä niitä niin monta väriä kuin haluat - riippuen siitä, kuinka monta rikkoutunutta värikynää sinulla on.
DIY-ohjeet ja projektiluotto - Momtastic

Käytä rikkoutuneita levyjä maadoitukseen
Vaikka et todellakaan halua rikkoutuneita levyjä todelliselle pihallesi, voit käyttää niitä multaa sijasta antaa tietyille alueille hieman väriä. Sen sijaan, että täytät puiden ympärillä esimerkiksi multaa tai pikkukiviä, käytä näitä rikkoutuneita lautasia tai terrakottaruukkuja. Voit tehdä ne yhdellä värillä, jotta se näyttää todella tyylikkäältä, tai sekoittaa sen hauskempaa ja jännittävämmän ilmeen kanssa. Se on paljon halvempaa kuin multaa ja herne soraa ja antaa sinulle todella ainutlaatuisen ilmeen puutarha-alueillasi.
DIY-ohjeet ja projektiluotto - Apartmenttherapy

Käytä rikkoutuneita levyjä puutarhareunuksina
Voit käyttää rikkoutuneita lautasia ja lautasia reunana puutarhojen ja puiden ympärillä. Jos sinulla on vanhaa posliinia, josta et todellakaan voi saada itseäsi eroon, luo noilla levyillä kaunis raja puutarha-alueille. Halkeillut tai haketetut levyt voidaan rikkoa kahtia (tietysti huolellisesti) ja sitten puolikkaat yksinkertaisesti tunkeutua maahan. Voit käyttää samoja värejä tai sekoittaa sitä hieman. Tämä auttaa sinua huolehtimaan näistä levyistä ja antaa sinulle todella edullisen mutta kauniin reunan suosikki ulkotiloihisi.
DIY-ohjeet ja projektiluotto - Wondermom

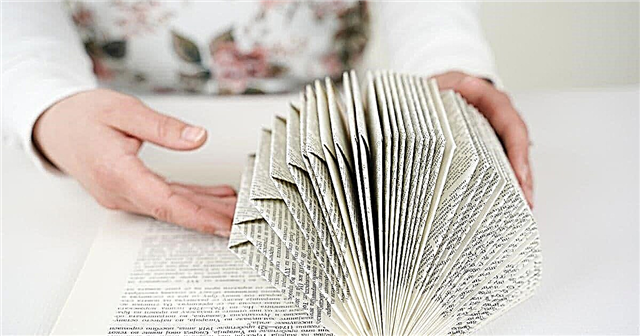
Muuta vanha kirja taidekirjaksi
Jos sinulla on vanhoja kirjoja (tiedät, puolet sivuista puuttuu), sinun ei tarvitse heittää niitä ulos. Voit todella käyttää vanhoja kovakantisia kirjoja luodaksesi todella siistin ja todella toimivan taidekirjan, johon mahtuu kaikki lapsesi taidetarvikkeet. Nämä ovat erinomaisia matkustamiseen, koska ne vievät vähän tilaa ja heillä on erittäin hieno pieni kahva helppoon kantamiseen. Tarvitset vähän kangasta pitimien tekemiseen lyijykynille tai värikynille, sitten kahvan ja tietysti taidetarvikkeet.
DIY-ohjeet ja projektiluotto - Cosmocricket

Muuta rikki värikynät viileiksi työntövoimiksi
Push-up-väriliidut ovat vähän kalliita, ja useiden värien ostaminen ei välttämättä ole budjetissasi. Mikä olisi parempi tapa päästä eroon vanhoista rikkinäisistä värikynistä kuin tekemällä omat värikynän punnerrukset? Voit myös poistaa nämä tyhjät liimapuikkoastiat samanaikaisesti. Sinun tarvitsee vain puhdistaa liimapuikot ja kaada sitten sulatettu värikynä niihin. Lapset voivat sitten rullata värikynät ylös ja alas tarpeen mukaan. Tämä on hieno projekti, jonka avulla lapset voivat auttaa sinua, koska se on todella helppoa eikä ollenkaan sotkuista.
Tee-se-itse-ohjeet ja projektiluotto - infarktisesti luova

Käännä rikki keramiikka suunnittelijakoneiksi
Voit käyttää rikkoutuneita lautasia, lautasia, teekuppeja tai mitä tahansa vastaavaa luoda kauniita suunnittelija istutuskoneita. Voit vain käyttää mosaiikkimenetelmää kiinnittämään rikkoutuneet kappaleet terrakotta-istutuskoneeseen vahvalla liimalla tai mod-podgeilla. Tämä on loistava tapa osoittaa luovuuttasi tekemällä malleja ja kuvioita tai vain laittaa se sinne haluamallasi tavalla. Istutuskoneet ovat ainutlaatuisia ja kauniita, eikä sinun tarvitse lähettää näitä vanhoja rikki astioita kaatopaikalle.
Tee-se-itse-ohjeet ja projektiluotto - Allfreecrafts

Tee valoja rikki maapallosta
Onko maapallosi hajonnut saumoista? Jos siinä on, etkä halua tai et voi liittää sitä yhteen, luo sen sijaan nämä todella ainutlaatuiset valot. Nämä sopivat hyvin lastenhuoneisiin tai voit jopa pitää ne keittiössä, jos haluat. Ne ovat toiminnallisia ja opettavia samanaikaisesti. Voit maalata sisäpuolen kontrastivärillä ennen valojen asentamista, jotta ne todella erottuvat tai vain jättävät luonnollisen värinsä. Joko niin, nämä valot herättävät varmasti keskustelun.
DIY-ohjeet ja projektiluotto - Instructables

Käännä rikki värikynät ja tyhjät purkit värikkäiksi kynttilöiksi
Tyhjät purkit tai maljakot ja muutama rikkoutunut värikynä voivat yleensä päätyä roskakoriin, mutta voit yhdistää ne ja luoda todella värikkäitä kynttilöitä. Sulata vain väriliidut ja kaada ne väreittäin. Voit tehdä nämä vanhoissa Mason-tölkeissä todella maalaismaiselle kynttilälle tai käyttää mitä tahansa lasipurkkia, jonka aiot heittää pois. Nämä tekisivät todella siistejä lahjoja, jos haluat yhdistää parin koriin ja niiden luominen vie hyvin vähän aikaa.
DIY-ohjeet ja projektiluotto - Notimeforflashcards

Muuta rikkoutuneet korut uusiksi paloiksi
Voit ottaa rikki korut ja laittaa ne yhteen luomaan upeita rannekoruja ja rannekkeita, eikä se vie niin kauan. Ota vain rikki korusi ja muutama korunvalmistustyökalu, jos sinulla on niitä (jos et, ne ovat todella halpoja paikallisessa käsityöliikkeessä). Voit tehdä ainutlaatuisia ja erittäin luovia teoksia, jotka sopivat tyyliisi, tai luoda jotain erityistä lahjaksi. Vanhoja pukukoruja ei tarvitse heittää pois, kun ne ovat rikki. Tee vain jotain täysin uutta heidän kanssaan.
DIY-ohjeet ja projektiluotto - Hellohydrangea

Luo magneetteja rikki koruista
Ota vanhat rikki korvakorut, kaulakorut ja rannekorut tai rintakorut ja luo niistä kauniita magneetteja. Sinun tarvitsee vain liimata jalokivi magneettiin ja käyttää niitä sitten pitämään jääkaapisi tai ilmoitustaulusi kauniina. Jos sinulla on suurempia paloja, voit tehdä niistä magneetin tai laittaa pienempiä yhteen muodostaaksesi kuvion ja liimaa sitten magneettiin. Kuuma liima toimii hyvin pitääkseen jalokivet magneeteissa, ja jääkaapisi näyttää tyylikkäältä ja upealta, kun pukeudut siihen vanhojen rikkoutuneiden pukukorujen kanssa.
DIY-ohjeet ja projektiluotto - Livelovediy

Tee lintujen syöttölaitteet rikkoutuneista teekuppeista
Jos sinulla on haketettu tai rikkoutunut teekuppi ja lautanen, jonka aiot heittää pois, tee niiden kanssa lintujen syöttölaite. Voit tehdä nämä noin tunnissa ja tarvitset vain teekupin tai mukin, lautanen, vedenpitävän liiman ja jotain ripustettavaa syöttölaitetta tai sen kanssa. Lisää linnunsiemeni ja olet onnistuneesti muuttanut roskakorin aarreksi. Lintusi rakastavat uutta syöttölaitettaan ja rakastat yksinkertaista eleganssia, kun sinulla on kaunis teekuppi ja asetti pihallasi.
DIY-ohjeet ja projektiluotto - Blogglebeans

Käännä rikki korut kaappiin
Rikkoutuneita rannekoruja, korvakoruja ja kaulakoruja voidaan käyttää luomaan kauniita kaapin vetimiä kylpyhuoneeseen tai keittiöön, mikä tahansa mieltä olet. Ota vain rikki korut ja liimaa ne kierteitettyyn pylvääseen. Voit noutaa kierretankopaketit ruuveilla paikallisesta rautakaupasta noin $ 1 tai niin. Käytä jalokiviä paikallaan käyttämällä epoksiliimaa tai jotain muuta vahvaa. Suuremmat pukukorut toimivat parhaiten, tai jos sinulla on pienempiä kappaleita, voit liimata ne alustalle ja sitten liimata pohjalle pylvääseen.
Tee-se-itse-ohjeet ja projektiluotto - Threescoopsoflove

Tee joulukoristeita rikkinäisillä CD-levyillä
Kun CD-levyjä naarmuuntuu tai sirutaan, ne eivät enää toimi kunnolla. Sen sijaan, että heität ne roskakoriin, käytä niitä luomaan minidiskopallakoristeita, jotka voivat kaunistaa puustasi tulevana jouluna. Sinun tarvitsee vain rikkoa CD (olettaen, että se on suhteellisen ehjä) ja sitten liimata nuo palat lasikoristeisiin kuumalla liimapistoolilla. Voit kokeilla tätä myös polystyreenipalloilla, jos haluat, mutta lasi toimii paljon paremmin. Voit tehdä kirkkaan lasin tai peittää koristeita eri väreillä hopea-CD: llä luodaksesi todella värikkään ilmeen.
DIY-ohjeet ja projektiluotto - Cremedelacraft

Tee Potpourri-kulho rikkoutuneesta maapallosta
Jos sinulla on vanha maapallo, joka on jollakin tavalla rikkoutunut, voit ottaa parhaan puoliskon ja luoda kauniin kulhon potkurin esillepanoon tai jos maalat sen sisäpuolen, voit jopa käyttää sitä hassuina tarjoilukulhona. Tarvitset pyöreän puukyltin liimaamaan maapallon pohjaan, jotta se pysyy tasaisena, kun se on täynnä, mutta voit noutaa ne paikallisesta käsityöliikkeestä hyvin vähän. Tai jos sinulla on pala vaneria, leikkaa vain yksi itse. Liimaa sitten maapallo puoliksi pohjaan ja ota hieno kulho. Jos maapallosi molemmat puoliskot ovat hyvässä kunnossa, voit tehdä kaksi kulhoa.
Tee-se-itse-ohjeet ja projektiluotto - ennalta suunniteltu palautus

Luo yöpöytiä rikkoutuneesta työpöydästä
Jos sinulla on vanha työpöytä, joka on rikki, kulunut tai muuten vahingoittunut, sinun ei tarvitse heittää sitä ulos. Käytä sen sijaan sitä luomaan sopivat yöpöydät. Vaikka yläosa on täysin korjattavissa, voit tehdä yöpöydät työpöydältä ja yksinkertaisesti hioa ja maalata ne vastaamaan nykyistä makuuhuoneesi sisustusta. Tämä toimii parhaiten pöytien kanssa, joissa on sama määrä laatikoita kummallakin puolella, tai voit luoda vain yhden jalustan pöydästä, jos haluat tai jos sillä ei ole vastaavia laatikoita kummallakin puolella.
DIY-ohjeet ja projektiluotto - Sugarbeecrafts

Luo ranskalainen tyylipenkki rikkoutuneista tuoleista
Sen sijaan, että heittäisit vanhoja rikki ruokailutuoleja, ota ne ja luo upea ranskalainen innoittama penkki. Tämä on yksi tyylikkäimmistä rikkoutuneiden huonekalujen projekteista ja yksi helpoimmista. Tarvitset kaksi samaa tyyliä ja sinun on luotava puinen "laatikko" penkkiistuimelle. Maalaa sitten pohjimmiltaan haluamasi värin (valkoinen tekee siitä tyylikkään) ja lisää kevyt tyyny. Tämä on loistava paikka sängyn jalkakäytävälle, sisäänkäynnille tai melkein mihin tahansa muuhun kotiisi, ja voit tehdä siitä käytännöllisesti katsoen mitään (verrattuna ostamiseen sadoilla dollareilla).
DIY-ohjeet ja projektiluotto - Anoregoncottage

Tee hienoja ripustimia rikki tuoleista
Rikkoutuneiden tuolien selkänojilla voidaan luoda erittäin ainutlaatuisia ja viileitä ripustimia. Sinun on yksinkertaisesti poistettava selkänojat (tai nostettava ne, jos tuoli on täysin hajonnut) ja lisättävä sitten ripustinlaitteisto. Vaikka et todennäköisesti halua tehdä tonnia näistä kaappisi täyttämiseen, ne antavat sinulle jotain tekemistä niiden rikkoutuneiden tuolien kanssa, mikä on hyödyllistä ja auttaa pitämään roskat poissa kaatopaikalta. Lisäksi he ovat tarpeeksi hassuja tekemään upeita lahjoja.
DIY-ohjeet ja projektiluotto - Likecool

Käännä rikkoutuneet tuolit nurmikon keinuiksi
Jalkojensa menettännyt tuoli on täysin hyödytön ruokasalissa, mutta se voi olla täydellinen nurmikolle - kun teet siitä keinu. Voit ottaa vanhat tuolit ja yksinkertaisesti maalata ne, lisätä laitteita ja ripustaa ne pihasi kuistille tai suurelle puulle. Tämä on hieno idea kaikille, joilla on muutama ruokapöydän tuoli, jotka he harkitsevat heittämistä ulos, koska jalat eivät ole tukevia. Muunna ne kaikki keinuiksi, maalaa ne eri kirkkailla väreillä ja koristele nurmikkosi niillä.
Tee-se-itse-ohjeet ja projektiluotto - Thisdiylife

Käännä rikkoutunut polkupyörä kattilaan ja pannulle
Et tarvitse koko polkupyörää tähän projektiin, vain pyörää. Polkupyörän pyörät ovat täydellinen koko kattiloiden ja pannujen ripustamiseen, ja koska ne ovat pyöreitä, voit luoda niistä levysoitintelineen, jotta kattiloihisi ja pannuihisi on aina helppo päästä. Sinun tarvitsee vain kiinnittää ripustettava laitteisto pyörään, jotta voit kiinnittää sen kattoon. Lisää sitten koukut kattiloihisi. Tämä hyödyntää rikkoutuneita polkupyöriä ja antaa sinulle vähän järjestäytymistä keittiössä.
DIY-ohjeet ja projektiluotto - Instructables

Tee sängyn mobiili rikkinäisistä polkupyöristä
Tämä ei ole läheskään niin vaikeaa kuin miltä se kuulostaa. Et todellakaan ripusta polkupyöriä, mutta voit tehdä hienon matkapuhelimen rikkoutuneen polkupyörän pyörällä. Ympyrä on todella täydellinen muodolle ja pyörän pinnat sopivat erinomaisesti esineiden ripustamiseen. Tämä olisi myös hieno idea aurinkokuntaprojekteille, kun planeettojen, auringon ja kuun on oltava riippuvaisia peräkkäin. Pyöreän muodon ansiosta matkapuhelin kääntyy helposti ja voit lisätä melkein mitä haluat kiinnittää pienokaisesi huomion. Voit jopa laittaa siihen laatikon, jos haluat.
DIY-ohjeet ja projektiluotto - Numinationavenue

Rakenna palo kuoppaan rikkoutuneesta pesukoneesta
Et todellakaan tarvitse koko pesukonetta tähän projektiin - vain sisärummua. Voit rakentaa suuren takakuopan takapihalle ja säästää osan tästä aluslaatasta joutumasta kaatopaikalle samanaikaisesti. Sinun on käytettävä korkeaa kuumuutta sisältävää maalia ja siihen liittyy vähän työtä, mutta ei läheskään niin paljon kuin luulet. Pesurumpu antaa sinulle täydellisen muodon, joten palo kuoppasi on täydellinen ja se on todella helppo luoda. Kuvittele vain hauskaa, jonka istut tulen äärellä viileinä öinä, ja säästät vähän roskaa, kun teet sen.
DIY-ohjeet ja projektiluotto - Apartmenttherapy

Käännä rikki pukeutuja hyllyihin
Jos sinulla on rikki pukeutuja, voit tehdä laatikoista upeita karttatasoja. Tämä on hienoa, jos sinulla on pukeutuja, josta olet tekemässä jotain muuta, etkä todellakaan tarvitse kaikkia laatikoita. Voit lisätä kartan laatikon alaosaan ja ripustaa sen sitten seinälle tasaisesti luomaan shadowbox-tyyppisen hyllyn, johon mahtuu vähän keräilyesineitä. Tämä on niin helppo projekti ja ei vaadi, että laatikko on täydellisessä kunnossa, joten vaikka pohja putoaisikin, voit luoda nämä hyllyt sen sijaan, että istuttaisit vanhan lipaston roskakoriin.
DIY-ohjeet ja projektiluotto - Olivebites

Käännä rikki tikkaat kirjahyllyihin
Rikkoutuneet tikkaat eivät todellakaan ole jotain, jota haluat jatkaa. Jos sinulla on vanha puinen tikkaat, joka ei yksinkertaisesti ole enää turvallinen käyttää, älä heitä sitä heti. Sen sijaan, pura se ja käytä kahta osaa vastaavina kirjahyllyinä. Voit luoda upean maalaismaisen ilmeen näiden vanhojen tikapuiden kanssa ja joko ripustaa ne seinälle tai vain istuttaa ne seinää vasten (olettaen, että tukevat ne tietysti). Jokaisessa tikapuissa on kirjoja, keräilyesineitä tai melkein mitä tahansa muuta mitä tarvitset siellä.
DIY-ohjeet ja projektiluotto - tuskin mitattu

Käännä rikki pesukoneen rumpu sohvapöytään
Jos rakastat teollista ilmettä tai haluat vain hauskan ja ainutlaatuisen sohvapöydän, ota rumpu rikki pesukoneesta ja tee siitä pöytä. Voit peittää yläosan pyöreällä lasikappaleella (jonka haluat leikata) ja käyttää sisäpuolta tavaroiden säilyttämiseen tai luoda pienen varjon laatikon vaikutuksen. Mahdollisuudet tähän ovat rajattomat. Voit myös käyttää puupäätä, jos haluat tai asennat valaistuksen sisälle niin, että sohvapöytäsi valaisee olohuonetta.
DIY-ohjeet ja projektiluotto - Instructables

Tee rikkoutunut matkalaukku pöydäksi
Rikkoutunut matkalaukku (raskaat vintage-matkalaukut) ei todennäköisesti tee sinulle paljon hyvää, ellet käytä aikaa muuttaaksesi siitä jotain todella hyödyllistä. Lisäämällä matkalaukkuun jalat, voit luoda suuren pöydän, joka sopii täydellisesti olohuoneeseen tai sängyn jalkaan. Voit säilyttää tavaroita matkalaukun sisällä, joten se on hyvä pitää huone järjestyksessä, ja sillä on todella siisti vintage-ilme, joka on täydellinen niille, jotka rakastavat tällaista sisustusta.
DIY-ohjeet ja projektiluotto - Designsponge

Käytä rikkoutunut piano uudelleen työpöydälle
Onko sinulla vanha piano, joka ei enää toimi? Jos aiot lähettää sen kaatopaikalle, älä. Voit luoda sen sijaan vähän tallennustilaa ja organisaatiota. Vanha pystysuora piano on täydellinen koko ja muoto piilotetulle työpöydälle. Sinun on poistettava osa laitteista pianon sisältä, jotta tilaa työkaluille ja vastaaville, mutta tämä on hieno autotallien tai työpajojen kannalta ja paljon halvempaa kuin ulos meneminen ja penkin ostaminen. Lisäksi pianopenkki toimii erinomaisesti kirjojen ja aikakauslehtien varastointiin.
DIY-ohjeet ja projektiluotto - Core77

Käännä rikki Vintage matkalaukut lemmikkieläinten sänkyihin
Roskakorisi voi olla lemmikkisi aarre. Jos sinulla on vanha rikki vintage-matkalaukku, voit tehdä pienestä koirastasi tai kissastasi ihastuttavan sängyn matkalaukusta. Pohjimmiltaan sinun on vain poistettava yläosa (jotta se ei sulkeudu pieneen vauvaan) ja lisättävä sitten sängyn täytteet. Voit myös lisätä jalkoja ja jos sinulla on useampi kuin yksi lemmikki, joka tarvitsee sänkyä, käytä ylä- ja alaosaa kahden sängyn tekemiseen. Tämä on todella siisti ja erittäin helppo projekti, joka varmasti miellyttää lemmikkejäsi ja antaa sinulle myös hieman lisätyn vintage-sisustuksen.
DIY-ohjeet ja projektiluotto - kaoottisesti luova

Muuta pesukoneen rumpu siistiksi jakkaraksi
Ota rumpu rikki pesukoneestasi, lisää täytettä ja sinulla on täydellinen pieni jakkara. Voit myös lisätä siihen pyöriviä pyörän jalkoja, jotta saat vähän jotain erikoisempaa. Voit täyttää keskuksen täytteellä tai miettiä jonkinlaisen yläosan luomista peittämään keskellä olevan suuren rummun reiän. Lisää tiiviste sen päälle ja tee se irrotettavaksi, jotta voit käyttää sisäpuolta varastointiin. Tämä on hieno lapsille. Voit pitää heidän värityskirjat tai muut lelut sisällä ja he voivat istua siinä, kun he pelaavat.
DIY-ohjeet ja projektiluotto - Espritcabane

Käännä rikki kylpyamme sohvaksi
Todella? Sohva vanhasta kynsien jalka-ammeesta? Ehdottomasti. Tämä on vähän monimutkaisempi kuin jotkut uudelleensuunnitteluprojektit, mutta olisi sen arvoista luoda tämä kaunis ja tyylikäs sohva vanhasta keraamisesta tai rautakylvystä. Leikkaat vain etuosan, jotta tilaa sohvalle, lisäät täytteet ja maalaa sitten, jos haluat. Jos sinulla on vanha amme, jonka aiot heittää ulos, yritä sen sijaan luoda tämä upea sohva. Voit käyttää sitä makuuhuoneessa, olohuoneessa tai missä tarvitset hieman ylimääräistä istuinta.
Tee-se-itse-ohjeet ja projektiluotto - Greenmoxie

Käännä rikki hopeaesineet kasvimerkkeihin
Vanhoja taipuneita tai rikkoutuneita lusikoita ja haarukoita ei tarvitse heittää. Ajattele sen sijaan niiden muuttamista käsin leimattuiksi kasvimerkkeiksi. Tämä on todella siisti projekti, joka ei vain poista vanhoja hopeaesineitä, vaan antaa sinulle todella aidon ja maalaismaisen näköisen puutarha-alueen. Tämä helppo prosessi leimaa nimiä metalliin, joten näyttää siltä, että olet luonut mukautettuja merkkejä, kun todellisuudessa voit luoda ne itse roskakoriin valmiista hopeaesineistä.
Tee-se-itse-ohjeet ja projektiluotto - Mossymossy

Tee kaunis TV-jalusta rikkoutuneesta pukeutujasta
Sen sijaan, että heittäisit vanhan lipaston, kun laatikot eivät enää toimi kunnolla, muuta se tyylikkääksi TV-jalustaksi. Voit ottaa esiin kolme ylintä laatikkoa ja käyttää muita elokuvien, CD-levyjen tai pelijärjestelmien lisävarusteiden tallentamiseen. Pienellä hiomalla, maalilla ja muutamalla tunnilla voit luoda viihdekeskuksen, joka näyttää maksaneen omaisuuden, mutta maksaa sinulle vain muutaman dollarin. Voit tehdä tämän myös makuuhuoneille ja käyttää loput laatikot lipastolaatikoina, jos haluat.
Tee-se-itse-ohjeet ja projektiluotto - Domesticsuperhero

Tee rikkoutuneesta tietokoneen näytöstä akvaario
Tämä vie vähän työtä, mutta se on täysin sen arvoista, varsinkin jos olet joku, joka todella nauttii tekniikasta. Voit tyhjentää tämän näytön ja tehdä siitä upean akvaario säiliön lähettämisen sijasta. Lapset rakastavat kaloja ehdottomasti tietokonenäytössä, ja ne ovat suhteellisen pieniä (näytön koosta riippuen), joten ne vievät hyvin vähän tilaa. Huomaa, että tämä koskee vanhemman tyyppisiä näyttöjä. Et voi todella tehdä tätä taulutietokoneella.
DIY-ohjeet ja projektiluotto - Instructables

Tee rikkoutuneesta pystysuorasta tyylikkäästä baarista
Vanhaa pystysuoraa pianoa, joka ei enää soi sävelmää, ei tarvitse repiä ja heittää pois. Voit tehdä siitä kauniin baarin, joka on varmasti kaikkien cocktailjuhliesi hitti. Sinun on poistettava varsinaiset soittinosat ja sitten maalattava tai tahraava piano haluamallasi värillä. Avaimien alapuolelta voidaan tehdä upea viinilasipidike, ja takana oleva peili tekee siitä vieläkin tyylikkäämmän. Mikä upea tapa kunnioittaa vanhaa pianoa!
DIY-ohjeet ja projektiluotto - Househoneys

Tee hylly tuosta rikki kitarasta
Jos sinulla on kitara, jota ei yksinkertaisesti voi virittää enää tai joka on jollakin tavalla rikki, tee siitä todella siisti hylly. Sinun on poistettava kitaran etuosa (toivottavasti aiheuttamatta enää vahinkoa selälle ja kaulalle) ja lisättävä sitten vain hyllyt sisälle. Ripusta tämä musiikinystävän huoneen seinälle tai pidä sitä olohuoneessa, jotta kaikki voivat ihailla. Tämä on loistava paikka tallentaa CD-levyjä ja muita musiikkitarvikkeita tai voit käyttää sitä kirjojen hyllynä.
DIY-ohjeet ja projektiluotto - Diybudgetgirl

Käytä rikkoutuneita varastotietoja kasvien tyylikkyyden luomiseen
Sen sijaan, että heittäisit rikki runkoainetta, anna sen antaa valoa kasveille. Kun runkovarret rikkoutuvat, ne sopivat hyvin ruukkukasveihin. Kiinnitä vain kasvien lika sisälle ja lisää teekynttilän kynttilä todelliseen lasiosaan. This is a great project that takes only seconds and can be used for both indoor and outdoor plants. Be careful not to cut yourself on the glass. This works with any glass that has a stem for the base.
DIY Instructions and Project Credit – Dumpaday

Turn A Broken Refrigerator Into An Outdoor Ice Chest
If your fridge is broken and you’ve had to replace it, you may think that hauling the old one to the dump is the next step. Instead, turn that broken fridge into a great outdoor ice chest. You have to be sure to remove everything that causes the fridge to run (or did before it broke). Then just cover it with wood (cedar works really well) and create an ice chest that is perfect for your outdoor kitchen or deck. You can use the racks and baskets from the fridge for holding items inside the chest.
DIY Instructions and Project Credit – Reddit

Make A Kitchen Utensil Holder From A Broken Rake
When the handle breaks on your rake, don’t automatically trash it. You can use the rake part to create a really neat and rustic looking holder for kitchen utensils. You just have to clean the rake top up a bit to remove any rust and you may want to think about sanding and painting it if it’s really rusty. Then just hang it on the wall and stick your spoons and ladles on it. This is also a great project for holding tools in the garage or tool shed and you don’t really have to clean it up for that.
DIY Instructions and Project Credit – Community

Create A Basket From Broken Blinds
Broken mini blinds normally find their way to the trash can. After all, what could you possibly do with them other than throwing them away? You could actually use them to make a very neat little basket that takes very little time. You just use a weaving method to create the basket and remember to staple together as you go along so that the basket is sturdy. If you have pets that tend to tear up your mini blinds, use them to make baskets instead of tossing them. These baskets are perfect for holding office supplies or just about anything else you can think of.
DIY Instructions and Project Credit – Stephagruss

Make A Wineglass Holder From A Broken Rake
Keep the top of that old rake when it breaks and create a rustic wineglass holder. The sections of the rake top are perfect for holding stemmed glassware and it gives you a great country look. You can simply sand away any rust that may be on the rake and hang it in its natural form or you can paint it with spray paint if you need it to be a specific color to match your kitchen or dining room décor. This is a great project for those old rakes that have broken handles but the tops are still in good condition.
DIY Instructions and Project Credit – Tatteredstyle

Create A Beautiful Chair From Broken China
Instead of throwing out that china when it’s broken, use it to create a stunningly beautiful mosaic chair. This chair is relatively easy to make considering how complicated it looks and it’s a great way to preserve old china that you may simply not want to get rid of even when it’s broken. You just take the broken pieces and put them together on an old chair base in whatever pattern you want. You can use larger pieces or create a smaller mosaic pattern if you have smaller broken pieces.
DIY Instructions and Project Credit – Dishfunctionaldesigns

Build Picture Frames From Broken Mini Blinds
Old mini blinds that are no longer fit to hang aren’t necessarily trash. You can take those blinds and create picture frames in a number of sizes and colors. No matter what material your blinds are made of, you can make beautiful frames for your favorite pictures that are unique and will help you to save money on buying frames for those prints. You just have to measure the pictures that you want to frame so that you have an idea of how many pieces of the blind you need. Then just stack and staple the pieces together to create your frame.
DIY Instructions and Project Credit – Domesticimperfection

Use Chipped Teacups As Curtain Tiebacks
Instead of throwing out those decorative teacups or putting them in the back of a cabinet, use them to create elegant Victorian looking curtain tiebacks. You will need to cut a hole in the bottom for the curtain to come through and then screw a cup hanger into the window frame so that the handle of the cup can be hung. This is a beautiful look and is perfect for formal dining rooms, especially near the china cabinet where you have other dishes in the same pattern sitting.
DIY Instructions and Project Credit – Bhg

Make A Kindle Cozy From Torn Jeans
If you have old dishes that have seen better days, you can use them to create beautiful lighting for your kitchen or breakfast nook. You need cups and saucers in the same pattern or you could use different patterns and make it really unique and interesting. You will need to attach the lighting and this is better done on a wooden plank so that you can keep all of the cups and saucers straight and even. This is a neat project though and one that really won’t take you long.
DIY Instructions and Project Credit – Punkprojects

Make Lighting From Chipped Cups and Saucers
If you have old dishes that have seen better days, you can use them to create beautiful lighting for your kitchen or breakfast nook. This is a neat project though and one that really won’t take you long.
DIY-ohjeet ja projektiluotto - Apartmenttherapy

Turn Broken Shutters Into Garden Holders
A broken shutter and some mason jars give you the perfect materials to create a little mini garden for the home or yard. You just have to clean up the shutter, paint if you want and then add the mason jars which are held in place with hot glue. If you are planning to add heavier plants, use clamps. You can cover them up with twine or ribbon. This is great for a kitchen herb garden and keeps you from having to haul those old shutters off to the dump.
DIY Instructions and Project Credit – Sheknows

Use Broken Records To Make Bookends
Have some old vinyl records that are scratched beyond repair? You can use those records to make really cool bookends, which are perfect for teenager’s bedrooms or family rooms for the musically inclined. There is a really easy method that will allow you to bend the bottom of the records so that they sit flat on a surface. Then you just have to add your books. This is also a great way to organize those records or CDs that you have lying around. Just create the bookends from torn or scratched records and use them to keep good ones in place.
DIY Instructions and Project Credit – Homesessive

Create A Bulletin Board From Broken Mattress Springs
If you have smaller mattress springs (think baby bed mattresses or twin beds) you can use those springs to make really useful bulletin boards. This is actually a really neat project that you can customize however you want. Add a mirror, some shelves or just whatever else you want and then just sit the springs up against the wall near your desk. You can also hang it on the wall with some sturdy hardware which is great if you don’t really have floor space available.
DIY Instructions and Project Credit – Funkyjunkinteriors

Turn A Broken Door Into A Shelf
After you replace that broken door and before you throw out the old one, consider turning it into a glorious shelf. You can add fabric, batting and even lighting to create a wonderfully unique shelf that is as functional as it is lovely. The door can stand in the corner or up against a wall or you could add hardware to it for hanging. Older doors give you a great rustic look and you can add as many shelves as you need. Plus, the lights help to illuminate your favorite books or collectibles.
DIY Instructions and Project Credit – Bulbtoblossom

Make A Pot Rack From A Screen Door
If you have a broken screen door and you are considering replacing it, keep the old one. You can use that door to make a very roomy and very attractive pot rack for your pots and pans. Just repaint or re-stain the door and then use chains to hang it from the ceiling. You can add hooks to the screen part for hanging pots and pans and keep lids or other items on top so you get loads of organization and all from that broken screen door that you were planning to throw away.
DIY-ohjeet ja projektiluotto - Thekitchn

Turn A Broken Suitcase Into A Medicine Cabinet
Forget throwing that old vintage suitcase away. Even when it’s broken, that suitcase can be used to create a great looking and fully functional medicine cabinet. Just clean out the inside, add some small shelves and you have the makings of a beautiful vintage medicine cabinet that will bring to mind those old traveling medicine men. Add screws to the back to hang it on the wall and if you don’t really need to close the door, you can attach it to the wall open and add shelves on both sides.
DIY Instructions and Project Credit – House-capades

Make Shelves From Torn Books
If you have a few hardcover books that are missing pages or otherwise no longer being read, you can turn them into literal bookshelves. These are really neat and require very little work. In fact, you just have to hang a shelf bracket and then slide the book in. You can create an entire wall of these “book” shelves in just a few minutes and they are great for the bedroom of your favorite bookworm. They also work well in hallways to hold knick-knacks or just anywhere you need them.
Tee-se-itse-ohjeet ja projektiluotto - yksinkertainen

Turn A Broken Door Into A Coatrack
Take that old broken door, add a few coat hooks and perhaps some mirrored pieces and you have a beautiful coatrack that is perfect for your entryway or mud room. You can do this with even a small piece of a broken door and then just stain or paint it whatever color you need to match your existing décor. If you have an entire door, you could add shelving or create cubbies to hold shoes and other items in the mud room. This is a great repurpose idea for old doors and for organization as well.
DIY Instructions and Project Credit – Prettyhandygirl

Create Napkins From Torn Denim
If your closet is filled with torn jeans that you are tempted to throw away, think about making a few denim napkins first. You can create beautiful napkins with minimal sewing and these are great for summer cookouts. You basically just fold and sew the denim and you can create pockets for holding silverware. This is an easy project and one that you can work on with different materials so whether you have old jeans in the closet or any other clothing that is ripped or stained, you can make napkins from any of it.
DIY Instructions and Project Credit – Yourpocketstylist

Make A New Aquarium From That Broken Old TV
If you have an old console television that no longer works – or a smaller TV for that matter – you can use the base to create a beautiful new aquarium. You will need to be very careful when removing the electronic pieces of the television and when installing the glass and other aquarium parts. This is a great weekend project and if you do have a console television, you will end up with a great aquarium that sits on the floor. The top of the TV is turned into a lift-off lid so you can feed your fish and tend to the aquarium parts as they need serviced.
DIY-ohjeet ja projektiluotto - Apartmenttherapy

Make Mirrors From Broken Rackets
Instead of trashing those tennis rackets when the insides come loose, turn them into sporty mirrors. You simply have to remove the netting from inside the racket and then add a mirror to fit that space. You may need to take the measurements (or the entire racket if it’s easier) to a glass cutter to get a mirror shape that will fit perfectly. Then just attach the mirrors to the rackets and hang them in your little tennis player’s bedroom or anywhere in the house.
DIY Instructions and Project Credit – Countryliving

Make A Garden Trellis From Broken Tennis Rackets
When you have several tennis rackets that are no longer fit for use (or you could use badminton rackets for this as well) you can turn them into a really nice looking trellis for the garden. This is great for homes with tennis players and it gives you something to do with those rackets instead of simply throwing them away. You just have to gather and group your rackets together, prepare a frame for them and then assemble it. You can paint them all the same color or go with different colors if you want something a bit bolder.
DIY-ohjeet ja projektiluotto - Apartmenttherapy

Turn Broken Drums Into Lights
If you have a drummer in the family and you happen to have a broken drum set, you can make gorgeous drum lights. These are great for the bedroom of your rock star or you could use them in a family room or rec room, whatever you prefer. They are relatively easy to make and can be easily hung from the ceiling. The drums work perfectly as lights and are a great touch if you are looking for something a bit out of the norm for your lighting. Plus, it keeps you from adding those drums to your local landfill.
DIY Instructions and Project Credit – Makelyhome

Create Stuffed Animals From Turn Gloves
If your gloves tend to only last one season before they rip or tear, you can make them last a bit longer by turning them into adorable stuffed animals. This is a great project to begin for the Christmas season as these little cuties make wonderful gifts for all the kids on your list. This is also a good project if your gloves have the fingertips missing because you will remove them anyway. You will have to do a bit of hand sewing but the project is really easy overall.
DIY Instructions and Project Credit – Boredpanda

Make Chainmail From Pop Tabs
Okay, so you would probably be throwing out those pop tabs with the cans, right? If you want, you can use those tabs to create a fabulous chainmail purse. It takes a little preparation and cutting to get the tabs ready but once you are done with that, you can simply put them together and create any number of chainmail items. You can do anything from a purse to a costume to picture frames or just about anything else that you can think of to create from your homemade chainmail.
DIY Instructions and Project Credit – Instructables

Turn Toilet Paper Rolls Into Art
Okay, so they’re not technically broken but empty toilet paper rolls belong in the trash, right? Well, maybe not. You can actually use them to create stunning wall art so if you tend to like recycling, this is the perfect project for you. You can do this in any number of designs and the paint can be in any color that you need. No one but you will know that your elegant art actually began life as a cardboard toilet paper roll and you can help to minimize your trash by not having as many rolls to throw out every week.
DIY Instructions and Project Credit – Cutoutandkeep

Make Birdhouse Stands From Broken Ladders
When your old wooden ladders are no longer safe for you to stand on, you can turn them into beautiful stands for your birdhouses. This works with ladders of all sizes. If they are wooden, just paint them or leave them as they are if you want something a bit aged and rustic looking. You simply have to sit the birdhouses on top of them and you may want to attach them with a screw to keep them secure. You could have these sitting all over your garden area.
DIY-ohjeet ja projektiluotto - Hometalk

Turn A Broken Bed Into A Bench
An old headboard and footboard can be used to make a wonderful corner bench for the little ones. You just have to attach the two together, create the actual seat and then paint or stain the color that you want. Add a cushion and your little ones will adore sitting here to eat or play. You could use this in the dining room or put it outside on the deck if you need extra seating out there. It’s an easy project and a great way to use up those old parts from your broken beds.
DIY Instructions and Project Credit – Myrepurposedlife

Make A Beautiful Bench From That Broken Dresser
This is a great project for dressers that have several broken drawers. While you may want a couple of the drawers to work properly for use on the bottom, the rest of the dresser is basically removed to create the bench. You can then use the bench at the foot of your bed or even on a deck if you need additional outdoor seating. Paint or stain any color and create something that perfectly matches your existing furniture. This is an easy project that will take you less than a day to complete and keeps you from throwing out that broken dresser.
DIY Instructions and Project Credit – Prakticideas

Create Stunning Jewelry From Broken Clothespins
If you have had your clothespins for long, you may notice that the wood has begun to chip or pull completely apart from the spring. Go ahead and pick up new clothespins but save those old broken ones to create stunning jewelry. This is such an easy project and one that doesn’t require any special tools. Plus, it’s a great gift idea that is not only cheap but allows you to use up those springs instead of tossing them out. You can create pendants, earrings or even charm bracelets with them.
DIY Instructions and Project Credit – Michlinla

Create Pedestal Picture Frames From Broken Materials
Take those broken or mismatched candlesticks and those picture frames that no longer hang or sit upright and create elegant pedestal frames that are perfect for gift giving or keeping all to yourself. Just spray paint the frames and candlesticks the same colors and then glue them together once the paint has dried. These are so very easy to make and are perfect for older frames that no longer want to sit where they should. Plus, you can use those candlesticks that you don’t have any other use for.
DIY Instructions and Project Credit – Fancyfrugallife

Create Storage From Torn Books
While you may balk at the thought of tearing up your old books, if you have any that are already torn then this is a great project. You simply hollow out those hold books and use them to store your belongings. You leave the outside intact so when you add them to your bookshelves, they look like real books. You can use them to store items safely out of view and they are really easy to make. You can do one at a time or create a little nook with several book covers.
DIY Instructions and Project Credit – Sewingbarefoot

Use A Broken Door To Make A Crafting Table
A broken door that you can’t really use on your home any longer is perfect for creating a colorful crafting table that your little ones will love. You just use the door as the top and then place it on cube organizers which work to hold all of your little ones’ craft supplies. Actually, if you made it tall enough this would even work as an adult’s crafting table so it just depends on what you need. You can cover the door with fabric or just paint it the color that you want.
Tee-se-itse-ohjeet ja projektiluotto - Marthastewart

Make A Lamp From A Broken Shovel
Have a broken shovel that you are planning to throw away? Before you do, take a look at this wonderful shovel lamp. It’s really easy to make and this is perfect for lighting up the pathway outside your garden area. Imagine the pattern that you could create if you had several of these. You could also use them for added lighting in the garage or in a workshop or just put them right there in the kitchen. You can spray paint your shovel whatever color you need so it’s easy to match the lamp to your existing décor.
DIY Instructions and Project Credit – Project-re

Create A Sporty Bag From A Torn Basketball
Basketballs don’t stay up forever. In fact, cheaper ones will begin losing air rather quickly and depending on the size of the hole in them, you may not be able to air them up again. When that time comes, you don’t have to toss them. You can make a fashionable and really cute bag from them that is perfect for any girl who is into sports. Note that you can do this with a volleyball or football as well so this is a great gift idea for your little cheerleader or a sports mom who is really supportive of her players.
DIY Instructions and Project Credit – Project-re

Turn A Torn Shower Curtain Into A Play Mat
When your shower curtain liner gets a hole or when the tops tear and you can’t keep it on the hooks any longer, you can turn it into a wonderful play mat that your children will adore. You can let the kids create roads and cityscapes for their toy cars or use dry erase markers and let them color their favorite pictures over and over again. Dry erase will wipe easily from the plastic liner so this is a great way to keep the kids busy and give them loads of creativity at the same time.
DIY Instructions and Project Credit – Filthwizardry

Keep Buttons From Torn Clothing for Jewelry
When you have a shirt or sweater that is torn or permanently stained, take a minute to remove the buttons before trashing the clothing. You can use those buttons to create beautiful button bracelets that are fun and would make the perfect inexpensive gift for someone special. You just cut a piece of elastic in the size you need, sew the ends together rather tightly and then sew on the buttons. You can create any number of designs and patterns and each bracelet can be completely unique.
DIY Instructions and Project Credit – Lillyella

Use Broken Dishes And Silverware To Make Wind Chimes
Have some broken china that you can’t bring yourself to part with? Or, perhaps you have some vintage silverware that can no longer be used for eating but you just hate to throw it out. Use those pieces to make beautiful wind chimes that you can hang from your porch. This lets you keep those dishes that you don’t really want to throw away and they make a beautiful sound when the wind blows. You could also use broken costume jewelry as accents if you have any on hand so this is a great project for using up a lot of your broken household items.
DIY Instructions and Project Credit – Songbirdblog

Turn A Broken Chandelier Into A Serving Tray
A broken chandelier (one that no longer works as opposed to one that is actually broken into pieces) makes a beautiful dessert tray. You will need to remove all of the hardware for the lighting from the base and each individual light. Then simply attach china plates to the places where the lights used to hand and use those plates for serving up your favorite desserts. This is a great project for upcoming weddings or is perfect for the Holidays when you want an elegant dessert tray. Broken costume jewelry like faux pearl strands are great for embellishing the tray.
DIY Instructions and Project Credit – Dreaming-n-color

Make Rag Rugs From Torn Clothing
Those old t-shirts that are no longer wearable and just about any other clothing that you may have that is ripped or torn can be used to make wonderful rag rugs. This is also a great project for torn sheets and even curtains in certain fabrics. You can use different clothing materials and colors to create a multi-colored rug or use sheets and old blankets in the same colors for something a bit more elegant. These rugs are perfect for the kitchen in front of the sink or you could use them in the bathroom as bath mats.
DIY Instructions and Project Credit – Littlehouseliving

Use Knobs From Broken Doors For Patio Flooring
Before you throw those old doorknobs away, even if the doors are completely useless, you can turn the knobs into beautiful flooring for your outdoor patio. Actually, you can also use those old burners from your stovetop that no longer work and other items around the house that are broken or otherwise trashcan bound. The different finishes will give your patio a great look and the pieces are very stable when you set them in soil and surround them with your favorite outdoor plants.
DIY Instructions and Project Credit – Sunset

Turn Doorknobs Into Wine Corks
When your doors are broken and in need of repair, keep the doorknobs and use them to create these beautiful and very unique wine corks. All you need are the decorative doorknobs and some cork, which you can buy at any craft or hardware store. You could also just use the cork that comes in your wine bottles if you wanted. This works best with old knobs that have screws in them or you could use old cabinet pulls if they are decorative enough. You simply have to push the screw into the cork by turning and get ready because this could take a bit of time. The end result however, is well worth the effort.
DIY Instructions and Project Credit – Brokegirlsguide

Empty Tin Cans Make Great Hairbrush Holders
While tins cans aren’t really broken, they are useless once you get the food out, right? Instead of adding them to your trash heap, use those cans to make wonderful holders for your hairbrushes. You just have to remove both ends of the cans, clean them very well with warm soapy water and then cover them with Washi tape, paint, wallpaper or just about anything else you want. Fabric works very well and hot glue does a good job of holding your cover in place. Then attach them with screws to the inside of your vanity door and you have a great place for storing and organizing brushes.
DIY Instructions and Project Credit – Thecreativeimperative

Turn Broken Picture Frames Into Decorative Molding
If you love the look of picture frame molding but aren’t really a fan of the cost, you can make your own with those old broken picture frames. If you have frames that have lost their backing or their glass has been broken, you just remove all of that, paint them the color that you want your molding to be and then hang them on the wall. You can use frames that are all the same size or create a pattern from frames of different sizes. This is a great look and one that seems expensive. Only you will know that you have salvaged trash to create it.
DIY Instructions and Project Credit – Bobvila

Make A Jewelry Holder From Broken Spindles
When stair spindles are broken, they may seem useless. You can however, repurpose them into gorgeous jewelry holders that are unique and very creative. You just have to paint them, add a base and then use them to keep your necklaces and bracelets from getting tangled. If you are looking for a unique gift idea and one that won’t cost a fortune, this is a good one. The best part is you make it from something that you were probably just going to throw away. You could also use an old drawer pull or broken costume jewelry to decorate it.
DIY Instructions and Project Credit – Sublime-living

Use Bent and Broken Silverware For Drawer Pulls
Instead of throwing out that old silverware when it bends or breaks, use it to make cabinet door handles instead. This is actually a really popular look and one that may cost a bit if you went out and bought all of those handles. Instead, you can make your own with silverware that you were planning to toss. If you have silverware that is tarnished beyond repair, simply clean it up a bit and paint it if you want to create rustic looking handles that look much more expensive than they are.
DIY Instructions and Project Credit – Whiteleycreek

Make Good Use Of A Broken Binder
When binders break, they are normally trash. After all, they’re really not that expensive and most people simply throw them out without considering what could be done with them. If you cut away the actual cover part, you can use the binder as a key holder. Just attach it to any wall with screws, which will fit nicely into the holes already in it, and then use it to hold keys or put it outside on the deck to hold grilling utensils, towels by the pool or anything else you need. You can paint it if you want or even mount a few of these onto a wooden base.
DIY Instructions and Project Credit – Upcycleus

Create A Stunning Table From A Broken Piano
There really isn’t a lot that you can do with an old piano when it stops working. You can however, create beautiful shadowbox type tables and depending on the size of your piano, you may be able to make two of these for the living room. You use the keys on the inside of the table to give it a really neat musical look and then cover with glass that you can have cut at your local hardware store or glass cutter. These are beautiful and help to somewhat preserve the look of the piano so you don’t really have to throw it all away. You can keep the best parts.
DIY Instructions and Project Credit – Trash2treasure

Turn Leaky Buckets Into Outdoor Serving Items
Those old leaky buckets are useless when it comes to holding liquid but they will serve as holders for your outdoor eating very nicely. You just take some time to give the bucket whatever look you want and then use it for holding silverware, napkins or other solid items when you eat out. Give it a great patriotic look and use it for your 4th of July table outside. It doesn’t take very long to create something great out of an otherwise useless bucket.
DIY-ohjeet ja projektiluotto - Hometalk

Make Soap Dispensers From Glass Bottles
If you tend to buy things in glass bottles (like certain bottled waters or wines for instance), you don’t have to necessarily chuck the bottles when they are empty. You can use them to make soap dispensers that are gorgeous and really functional. You will need to get some pumps which you can buy at a craft store or you could just preserve the pump from lotions if you want. Then just clean up and even decorate the bottles with broken jewelry, mosaics made from broken china or anything you want and fill with your favorite liquid soaps.
DIY Instructions and Project Credit – Theredchairblog

Make Coasters From Old Wine Corks
Instead of throwing out the corks when you are finished with the wine, use them to create great coasters. This is a great project for corks that no longer serve their purpose because they don’t need to be in perfect shape to make coasters. The coasters have a great beach-y look to them and they are easy to put together. You need a hot glue gun to attach them to each other and then just tie them off with ribbon or twine, whatever your preference. These are absolutely adorable and such a wonderful way to reuse those old corks.
DIY Instructions and Project Credit – Thefrugalnavywife

Make Monsters From Bread Clips
Once the bread is gone, you normally throw out the clips, right? Some people do use them for other things and if you are one of those people, this is a great Halloween project for you. You can turn those clips into adorable monsters that you hang on DIY garland to decorate for the holiday. Just paint monster faces on your bread clips and this works with clips of all sizes, even the ones that may be broken or chipped. Once you have your monster faces done, just clip them all onto a rope or string for hanging.
DIY Instructions and Project Credit – Craftyladylindsay

Create Berry Basket Snowflakes
Okay, so normally you would throw out those plastic berry baskets, especially if they’re broken. Before you do however, take a look at the beautiful snowflakes that you can create with them. This works well even with baskets that are broken or ripped. You really just need the bottom of the basket and it’s ok if the bottom is a bit worse for wear as well. Just create the snowflake shape and then glue and dip in glitter. These are great for hanging outdoors for the Holidays or you could even use them to decorate the tree.
DIY Instructions and Project Credit – Alphamom